Woodworker's Journal 2004 Summer, страница 70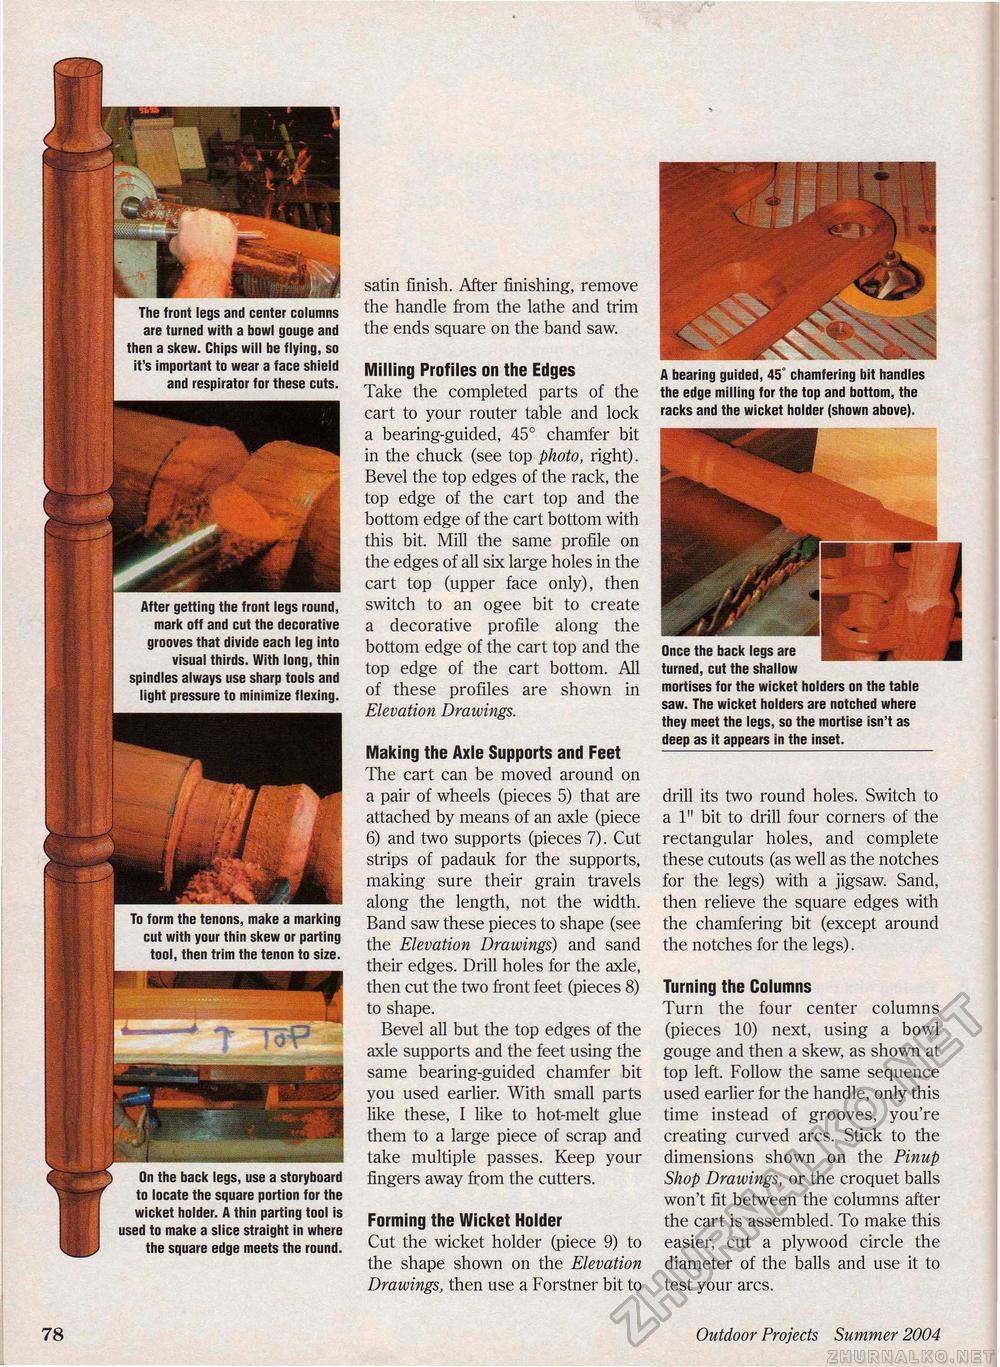
The front legs and center columns are turned with a bowl gouge and then a skew. Chips will be flying, so it's important to wear a face shield and respirator for these cuts. After getting the front legs round, mark off and cut the decorative grooves that divide each leg into visual thirds. With long, thin spindles always use sharp tools and light pressure to minimize flexing. To form the tenons, make a marking cut with your thin skew or parting tool, then trim the tenon to size. On the back legs, use a storyboard to locate the square portion for the wicket holder. A thin parting tool is used to make a slice straight in where the square edge meets the round. satin finish. After finishing, remove the handle from the lathe and trim the ends square on the band saw. Milling Profiles on the Edges Take the completed parts of the cart to your router table and lock a bearing-guided, 45° chamfer bit in the chuck (see top photo, right). Bevel the top edges of the rack, the top edge of the cart top and the bottom edge of the cart bottom with this bit. Mill the same profile on the edges of all six large holes in the cart top (upper face only), then switch to an ogee bit to create a decorative profile along the bottom edge of the cart top and the top edge of the cart bottom. All of these profiles are shown in Elevation Drawings. A bearing guided, 45° chamfering bit handles the edge milling for the top and bottom, the racks and the wicket holder (shown above). Making the Axle Supports and Feet The cart can be moved around on a pair of wheels (pieces 5) that are attached by means of an axle (piece 6) and two supports (pieces 7). Cut strips of padauk for the supports, making sure their grain travels along the length, not the width. Band saw these pieces to shape (see the Elevation Drawings) and sand their edges. Drill holes for the axle, then cut the two front feet (pieces 8) to shape. Bevel all but the top edges of the axle supports and the feet using the same bearing-guided chamfer bit you used earlier. With small parts like these, I like to hot-melt glue them to a large piece of scrap and take multiple passes. Keep your fingers away from the cutters. Forming the Wicket Holder Cut the wicket holder (piece 9) to the shape shown on the Elevation Drawings, then use a Forstner bit to drill its two round holes. Switch to a 1" bit to drill four corners of the rectangular holes, and complete these cutouts (as well as the notches for the legs) with a jigsaw. Sand, then relieve the square edges with the chamfering bit (except around the notches for the legs). Turning the Columns Turn the four center columns (pieces 10) next, using a bowl gouge and then a skew, as shown at top left. Follow the same sequence used earlier for the handle, only this time instead of grooves, you're creating curved arcs. Stick to the dimensions shown on the Pinup Shop Drawings, or the croquet balls won't fit between the columns after the cart is assembled. To make this easier, cut a plywood circle the diameter of the balls and use it to test your arcs. 78 Outdoor Projects Summer 2004 £ Once the back legs are turned, cut the shallow mortises for the wicket holders on the table saw. The wicket holders are notched where they meet the legs, so the mortise isn't as deep as it appears in the inset. |


